Anatomy of a necklace

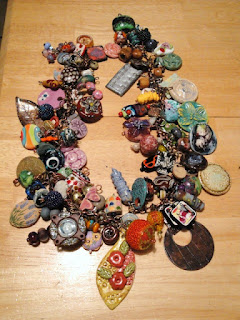
This is my thought process when creating a new piece of jewelry. Usually, I want to start with a focal; whether it be a single bead, or pendant for a simple look, or something larger, that would consist of a theme, pattern of repeating beads, or a set. In this case, I started with a set of beautiful handmade lampwork beads by "Quinlan Glass".
What do they look like? What do they remind me of? These beads have pretty bright, but clear colors, lentil in shape and remind me of hard candies. So, I already know that I want to use all the beads and create an outrageous, rather large piece. With the theme of "candy" being the focus, this necklace will be fun, very expressive, different and unique.
What to embellish the lampwork beads with? Well, I'll have to keep it simple here, as I plan to make larger "statement" type wire wrapped and metal creations in this piece. So not to get too distracted, or take away anything from the beauty of the beads themselves, I follow through with simple round silver beads. I've also added some gold round beads since there is some gold drizzle in the lampwork beads themselves.

Now for the fun and creative part! What kind of creative beads can I make with wire that go with this theme? I decide on 2 types. A sterling silver coil bead, that I hand coil and shape kind of off center to give it a crazy, fun appearance; and a fun "tumbleweed" style which is lots and lots of wire wrapped around all crazy like to form a ball. All these beads need to be wire wrapped now as connectors in the necklace. I still need a couple of "statement" type beads here, somewhat larger and to fill in the space, so it's not a 2 bead pattern. (A bead, a spacer, a bead, a spacer-this is somewhat boring to me, and does not work with such an intricate piece as this.)
I use heavier gauge wire;hammer to flatten, form into the shapes that I want, and texturize for nice detail and shiny highlights of the silver. I made 2 "S" shaped silver connectors, and 2 funky swan looking connectors.
Thus begins the layout. I place the beads and connectors on my work table and try to figure out how they will look the best. With this chunky of a style, I don't want to make it a short necklace, so I'm thinking of about 24 inches long. It will sit nicely around the neck, be a great show piece, and can be worn with different styles of tops, as say to embellish a neckline, or worn tucked under a collar, sort of artsy business like. You decide.
Two things to consider with the length. Will I need to make more wire beads? To either complete the length or to make it appear more unified.
And second, will the beads all connect together nicely and lay right with the eye pine connectors or will I have to add jump rings in between? If I add jump rings, I must hand make them, in the proper size for the necklace, which then will add much more length to the piece.
I connect a few together to have a look. It works without the jump rings!

Unto more layout and positioning. The two "S" connectors will look their best in front and somewhat across from each other. I space the other "swan" connectors a bit away from these, and then I thought I'd add an "artist's mark", so to speak. (If you're wondering what I mean, this is when an artist will deliberately "hide" something in their work; for example many painters, will add a mark, or image in their work, or have a fancy signature if you will.) This is something that the imagineers at Walt Disney World have done throughout the artistic creations and artwork in their theme parks. Known as "hidden Mickey's". (I'm somewhat of an aficionado of this!)
So, in my piece, I have placed one connector upside down. This really makes the piece unique, and doesn't break away from the look of the necklace. It adds to it.
The end unit or connector/closure: Since I've already established a swirl pattern throughout, I figured I'd end the necklace with a swan clasp, uniform in size with the rest of the necklace. Of course I need a couple of jump ring here, to have something for the clasp to connect to. I again use heavy gauge wire for the jump rings to add strength and stability to the connector.

Just a side note: I slightly use smaller beads getting up around the neck to the swan clasp. To make a clean break from the crazy patterns, I add 2 smaller beads before attaching the swan clasp. It gives it a neat finish. And speaking of finishes; I thought this necklace would be prettier, if left shiny and bright, not oxidized to a darker finish. I machine tumbled to clean, shine, strengthen and harden the metal to finish. So what you have is a bright, shiny, candy necklace, that says; "looky here, looky here", "Mmmmm, I look good enough to eat!"
I hope you've enjoyed this look into the "anatomy" of a necklace.
This piece is available for purchase in my Etsy shop.


Comments